Expiring App Secret Notifier
I noticed a couple of weeks ago that my 5-6-year-old App Secret Checker was once again failing due to an expired app secret. When I opened it, I realized how over-engineered it was, with expiring secrets and the use of Key Vault.
I decided to simplify the logic by utilizing Logic Apps’ own Managed Identity. The new version is now a third of the size of the original Logic App and no longer relies on expiring app secrets!
The goal of this solution is to get notified about expiring app secrets in my developer tenant. I wanted to send notifications as a Teams message to the Management Team general channel in my dev tenant. I’ve also included an email notification for additional visibility.
Solution Overview
The logic is fairly simple:
- Get all registered apps and check their secrets expiry dates.
- If any secrets are expiring within 30 days, append the information to a string variable as an HTML table row.
- At the end, send the expiring secrets as an HTML table via Teams and email notifications.
Let’s get started with the guide.
Requirements
- Azure subscription
- Resource group
- Microsoft Graph PowerShell module
- Automation/service user account with Teams and Exchange Online (Outlook) license
Create a logic app
- Start by creating a new Logic App in your Azure subscription.
- Select the resource group and region of your choice.
- Name your Logic App according to your naming convention. For this example, we’ll use Entra-Expiring-Secrets-Checker.
After the Logic App has been created, enable the Managed Identity:
- Open the Logic App in the Azure portal.
- From the left navigation menu, go to Settings → Identity.
- Enable the System-assigned identity.
- Take note of the Object (Principal) ID because you’ll need it in the next step to assign the necessary permissions.
Assign Permissions to Managed Identity
For this automation, we only need the Application.Read.All permission. If you want to expand the functionality, refer to the official documentation on Microsoft Learn for more details.
1
2
3
4
5
6
7
8
9
10
11
12
13
14
15
16
17
18
19

# Add the correct 'Object (principal) ID' for the Managed Identity
$ObjectId = "MIObjectID"

# Add the correct Graph scope to grant
$graphScope = "Application.Read.All"

Connect-MgGraph -Scope AppRoleAssignment.ReadWrite.All
$graph = Get-MgServicePrincipal -Filter "AppId eq '00000003-0000-0000-c000-000000000000'"

$graphAppRole = $graph.AppRoles | ? Value -eq $graphScope

$appRoleAssignment = @{
    "principalId" = $ObjectId
    "resourceId"  = $graph.Id
    "appRoleId"   = $graphAppRole.Id
}

New-MgServicePrincipalAppRoleAssignment -ServicePrincipalId $ObjectID -BodyParameter $appRoleAssignment | Format-List
Create the Logic
Open your Logic App in Edit mode, and let’s begin building the workflow.
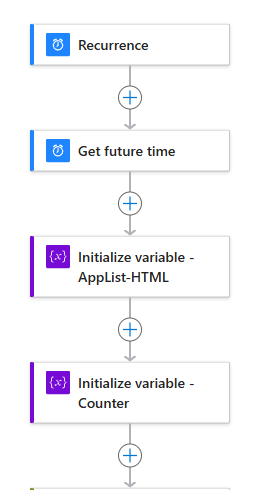
Step 1: Variables Setup
- Create a “Get future time” action
- Set your desired interval. For this example, I’ll use 1 month. This interval represents how far in advance you want to be notified about an expiring secret.
- Initialize a string variable
- Name the variable AppList-HTML.
- This variable will be used to store the HTML table row data for the list of expiring secrets.
- Initialize an integer variable
- Name the variable Counter.
- This variable will track the number of expiring secrets.
At this point, your Logic App should look like this:
Checker Logic
Now, let’s create the GET request to retrieve applications and build the checker logic.
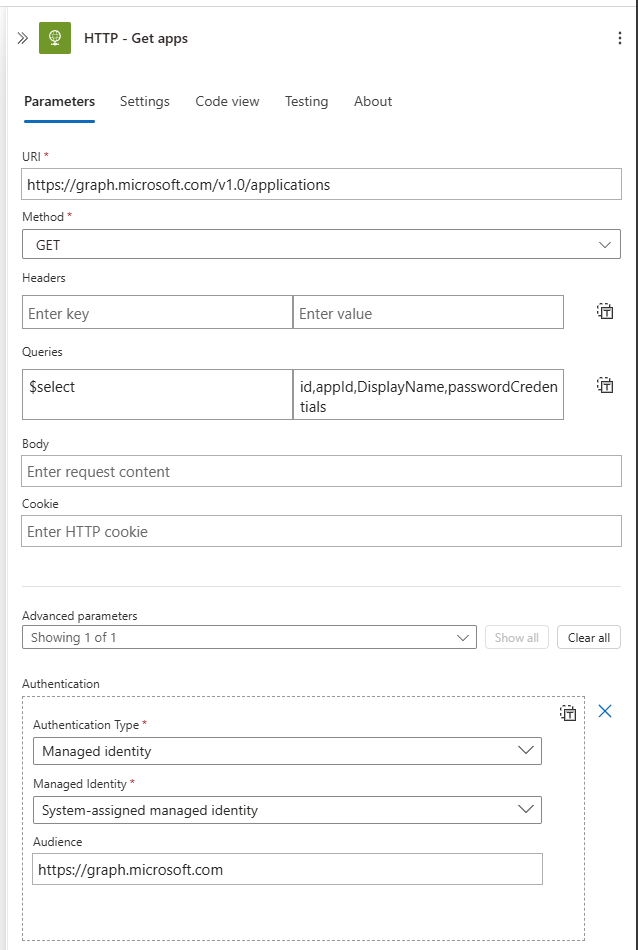
- Create an HTTP action
- URI:
https://graph.microsoft.com/v1.0/applications - Method:
GET - Queries:
- $select:
id, appId, displayName, passwordCredentialsAdvanced Parameters:
- $select:
- Authentication:
- Authentication Type:
Managed Identity - Managed Identity:
System-assigned managed identity - Audience:
https://graph.microsoft.com
- Authentication Type:
We use the $select query to retrieve the specific information we need, particularly the passwordCredentials field, which contains secret details. Since we already specified we need this field, it’s best to narrow down the query to return only the required results.
- URI:
- Create a “Parse JSON” action
- Set the input to HTTP body from the previous HTTP action.
- Use the following schema (provided below).
- I named my action Parse JSON - HTTP - Get Apps, as this name will be relevant in later steps.
1
2
3
4
5
6
7
8
9
10
11
12
13
14
15
16
17
18
19
20
21
22
23
24
25
26
27
28
29
30
31
32
{
    "properties": {
        "@@odata.context": {},
        "value": {
            "items": {
                "properties": {
                    "appId": {},
                    "displayName": {},
                    "id": {},
                    "passwordCredentials": {
                        "items": {
                            "properties": {
                                "customKeyIdentifier": {},
                                "displayName": {},
                                "endDateTime": {},
                                "hint": {},
                                "keyId": {},
                                "secretText": {},
                                "startDateTime": {}
                            },
                            "type": "object"
                        },
                        "type": "array"
                    }
                },
                "type": "object"
            },
            "type": "array"
        }
    },
    "type": "object"
}
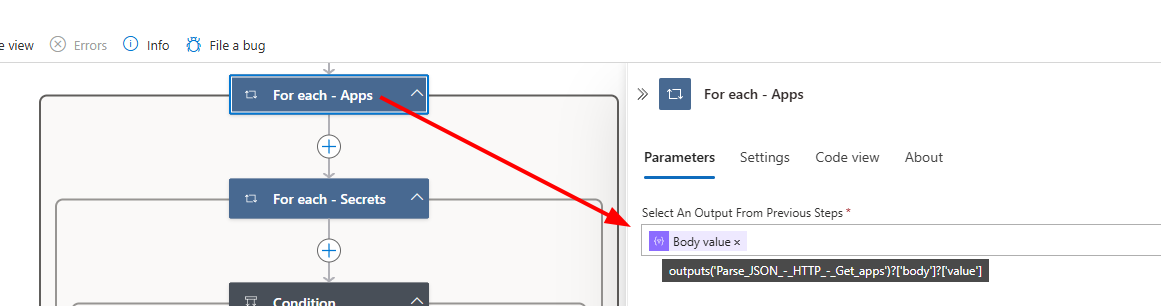
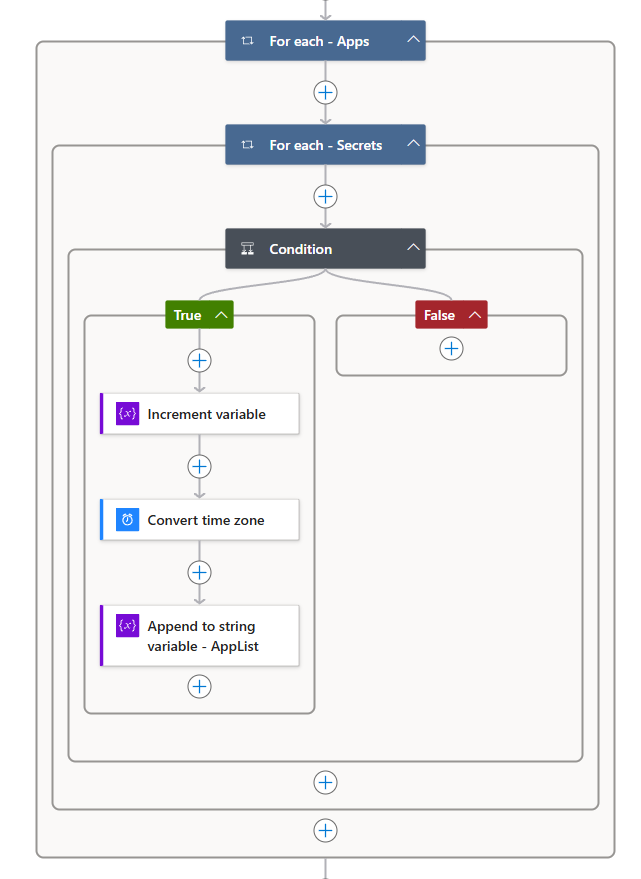
- Create a “For Each” loop for applications
- Name the loop For Each - Apps.
- Since we want to loop through the applications, set the output value to Parse JSON - HTTP - Get Apps -> values. Technically, this would be:
1
 outputs('Parse_JSON_-_HTTP_-_Get_apps')?['body']?['value']
- Create a “For Each” loop for secrets inside “For Each - Apps”
- Name this loop For Each - Secrets.
- Set the output value to passwordCredentials from For Each - Apps. Technically, this would be:
1
items('For_each_-_Apps')?['passwordCredentials']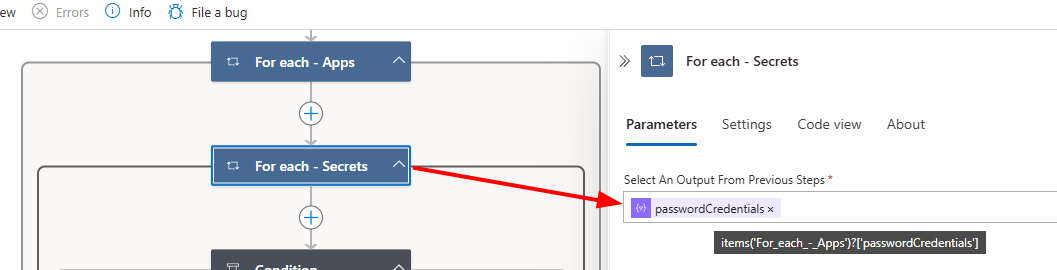
- Create a “Condition” action to check secret expiry
- The condition should check if endDateTime is less than the Future time value.
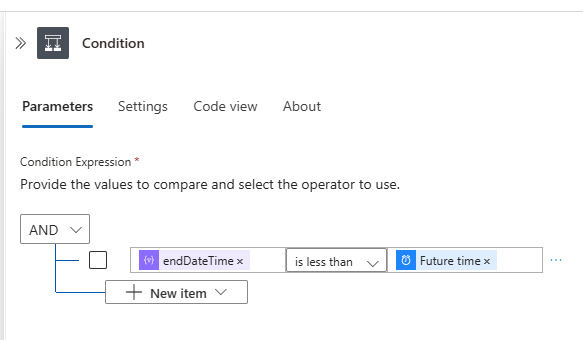
- The condition should check if endDateTime is less than the Future time value.
- In the True section of the condition:
- Create an Increment Variable action.
- Select Counter as the variable and set the value to 1.
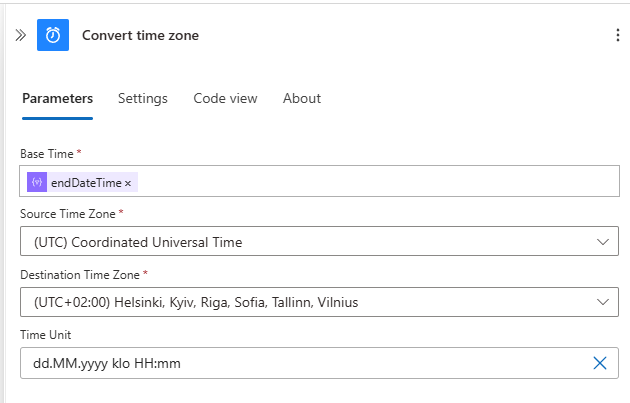
- Create a “Convert Time Zone” action
- Base Time: Use the endDateTime dynamic value from For Each - Secrets.
- Source Time Zone: (UTC) Coordinated Universal Time.
- Destination Time Zone: Select your preferred time zone.
- Time Format: Use your desired format. For this example, I’ll use a custom format:
1
 dd.MM.yyyy klo HH:mm
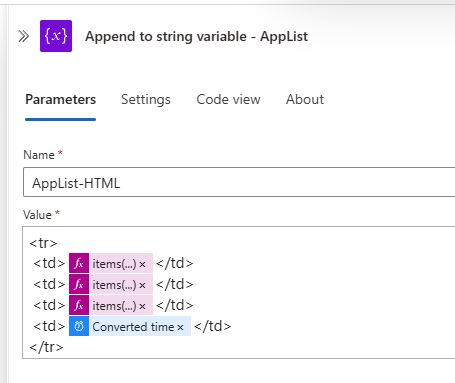
- Create an “Append to String Variable” action
- Select AppList-HTML as the variable to append to.
- Use the following HTML to append a table row with the relevant secret information:
1
2
3
4
5
6
<tr>
	<td>items('For_each_-_Apps')?['displayName']</td>
	<td>items('For_each_-_Apps')?['appId']</td>
	<td>items('For_each_-_Secrets')?['displayName']</td>
	<td>body('Convert_time_zone')</td>
</tr>
And that’s it! Your Checker Logic should now be complete.
Overview of the Actions
Here’s a quick overview of the actions you should have by this point:

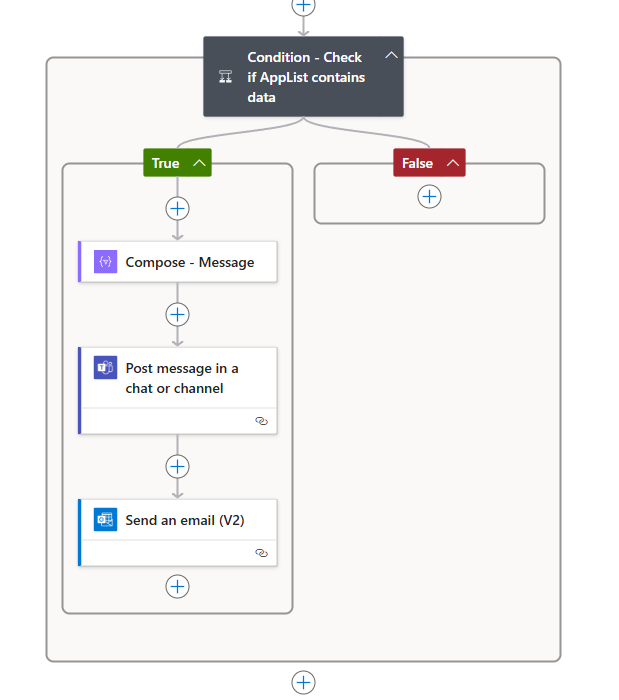
Notification logic
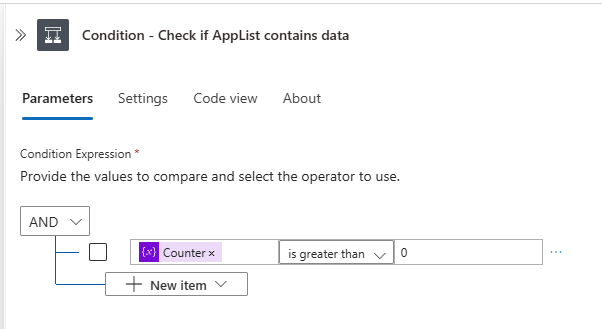
- Create a Condition at the root level of the flow
- This condition checks if Counter is greater than 0.
- This will ensure notifications are only sent if expiring secrets are detected.
- In the “True” section of the condition, create a “Compose” action
- Use the following HTML content in the Compose action:
1
2
3
4
5
6
7
8
9
10
11
12
13
14
 <style>table, th, td {border: 1px solid;}table{width: 100%;border-collapse: collapse; }</style>
 <table>
         <thead>
             <tr>
                 <th>App Display Name</th>
                 <th>App ID</th>
                 <th>Secret Display Name</th>
                 <th>Secret Expiry Date</th>
             </tr>
         </thead>
         <tbody>
             variables('AppList-HTML')
         </tbody>
 </table>
This Compose action contains the HTML for the table, with the AppList-HTML variable inserted between the
<tbody></tbody>tags to populate the table with your expiring secret details.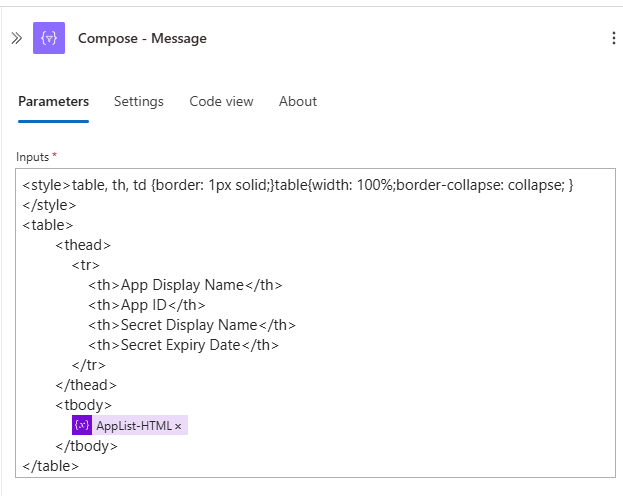
- Next, create a “Post Message in a Chat or Channel” action
- Post As: User
- Post In: Channel
- Team: Select your team
- Channel: Select your channel
- Message: Use the Outputs of your previously created Compose action.
- You can optionally add a subject for the message under Advanced Parameters if needed.

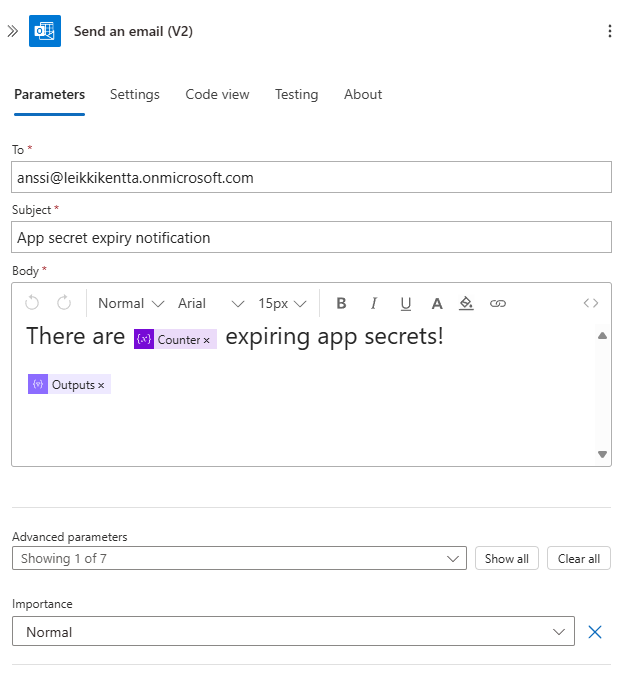
4.Finally, create a “Send an Email (V2)” action
- Add recipients to the To field.
- Add a subject line.
- For the Body, use the same Outputs from the Compose action that you used in the Teams message.
- Feel free to modify the email content as you wish.
And finally, that’s it! Your notification logic is now complete. You should receive both an email and a Teams message when there are expiring or expired secrets.
Here’s an example of teams message: 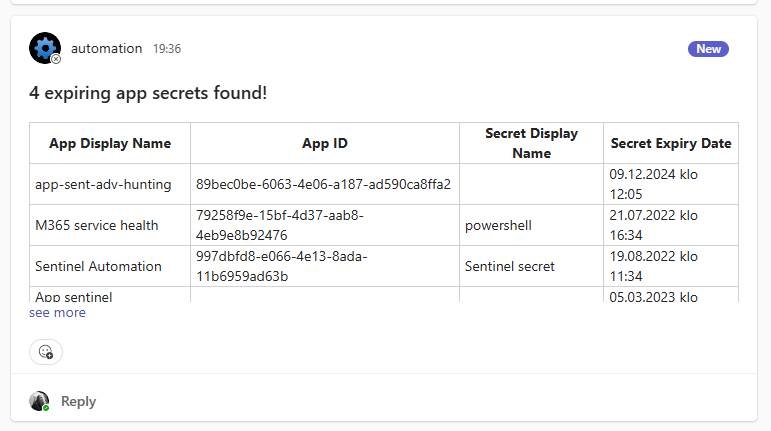
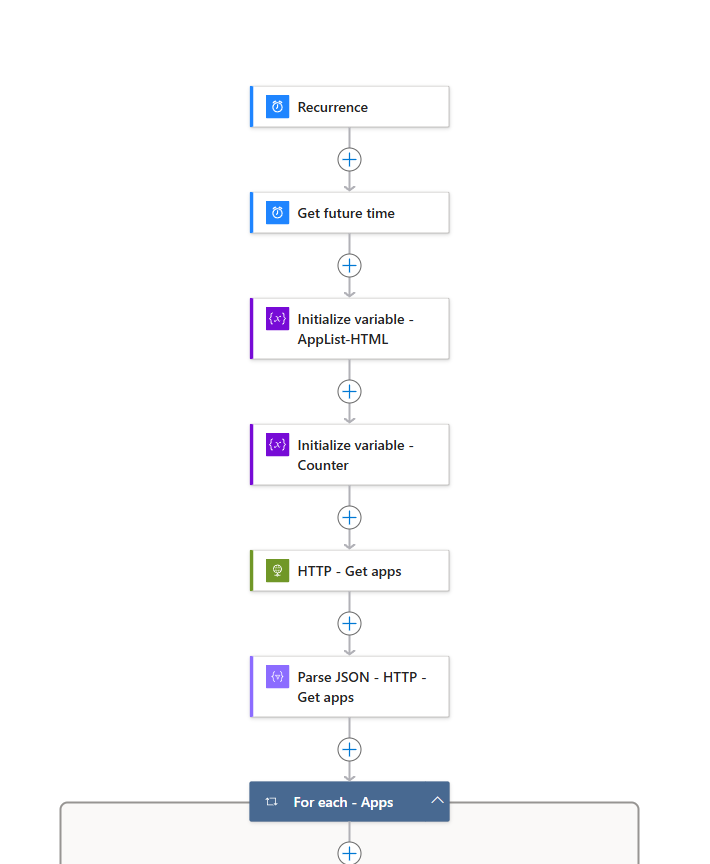
Overview of full logic app
Possible Modifications
Here are some ideas for additional improvements or customizations:
- Create an exclusion list
- Add an exclusion list for applications that you don’t want to monitor.
- Separate expiring and already expired secrets
- You can enhance the logic by creating separate tables for secrets that are about to expire and those that have already expired.
- Automate secret removal (optional)
This one was quite fun to work on! The original, monstrous Logic App I had was actually one of the first Logic Apps I ever built. It was nice to revisit it and bring it up to date.
I hope you find this guide helpful and that you can take something meaningful from it!
Here’s a link to my deployment templates in Github, apaivinen/Entra-ID-Logic-Apps
-Anssi
Sources
- Get application - Microsoft Graph v1.0 - Microsoft Learn
- https://learn.microsoft.com/en-us/graph/api/application-removekey
- Github, apaivinen/Entra-ID-Logic-Apps