Block Entra ID User with Conditional Access playbook for Microsoft Sentinel
This is my second method for blocking a user from signing in. In the previous example, I used the Graph API to modify a user’s accountEnabled property within a Sentinel playbook.
I wanted to find an alternative way to block users because many environments use on-premises Active Directory with Entra ID Sync enabled. When we block a user via the Graph API, Entra ID Sync automatically re-enables the account during the next delta synchronization. To avoid this, the account must be disabled in Active Directory rather than in Entra ID itself or Attribute writeback needs to be enabled. However, in my case, I only want to block the user’s ability to sign in to cloud apps without modifying the Entra ID Synchronization configuration.
Overview
This Sentinel playbook uses Conditional Access to block user access. We create an Entra ID group that Conditional Access targets to block specific users. The Conditional Access policy itself is straightforward: a “BLOCK” policy applied to the group we’ve created, while excluding any break-glass or emergency accounts.
The process works as follows:
- An incident is triggered.
- A Logic App is invoked from the incident.
- The Logic App retrieves the user’s details.
- The Logic App adds the user to the block group.
- The user is blocked from accessing cloud resources.
Create a Entra ID group
In Entra ID, create a security group, which I am naming “0 - SECURITY - BLOCK USERS”.
Since I don’t need to assign Entra ID roles, I’ll leave this setting set to No.
Set the membership type to Assigned, and be sure to include a group description. This will serve as a helpful reference later, reminding you of the group’s purpose.
Once the group is created, make a note of the Group ID, as it will be needed later. 
Create a conditional access policy
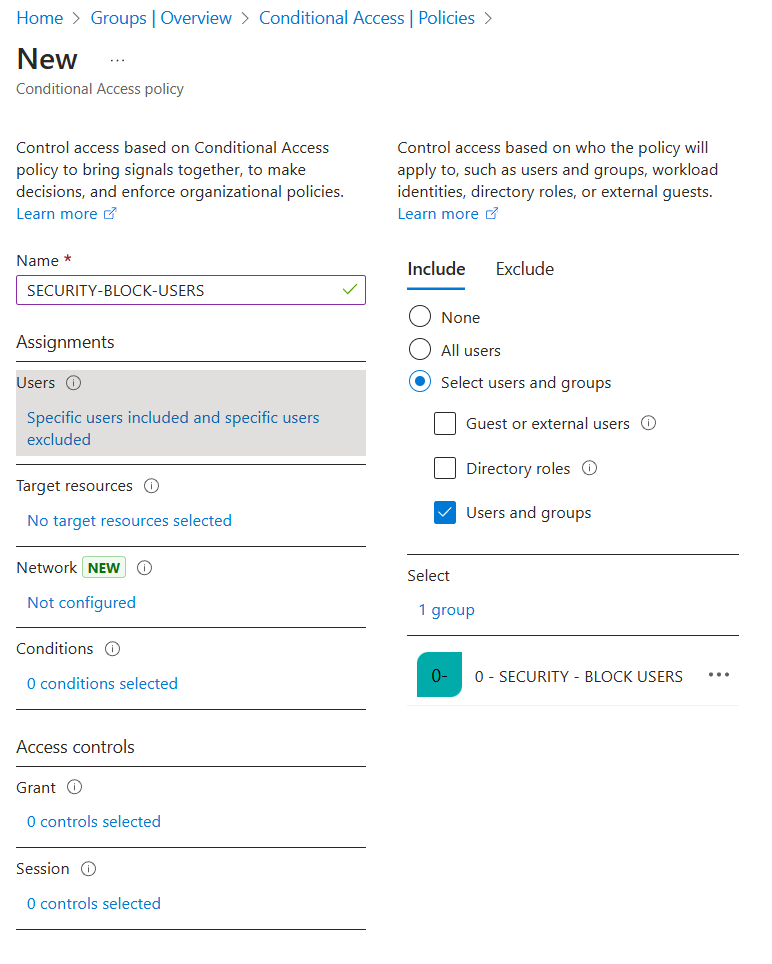
Create a new Conditional Access policy.
Include the security group you just created in the policy.
Be sure to exclude break-glass accounts and other emergency access accounts.
Users
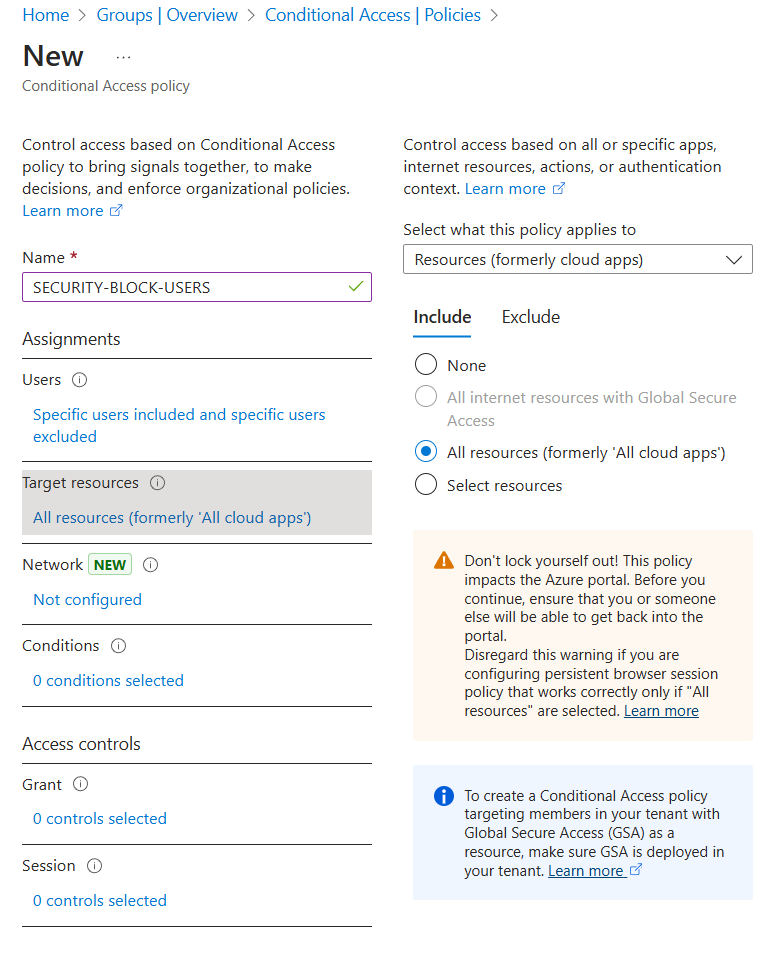
Target resources
Target all resources
Grant
Set grant to block access Enable policy and press create
Policy overview
This policy is a simple example for demo purposes. It essentially blocks all users in the group, except for those explicitly excluded. Be cautious, if users are not excluded in this policy, they may be locked out.
Create a Logic app
Similar to the previous Block User Logic App, create a new Logic App and enable Managed Identity.
Go to the Identity section in the Logic App settings, and turn on System Assigned Managed Identity. 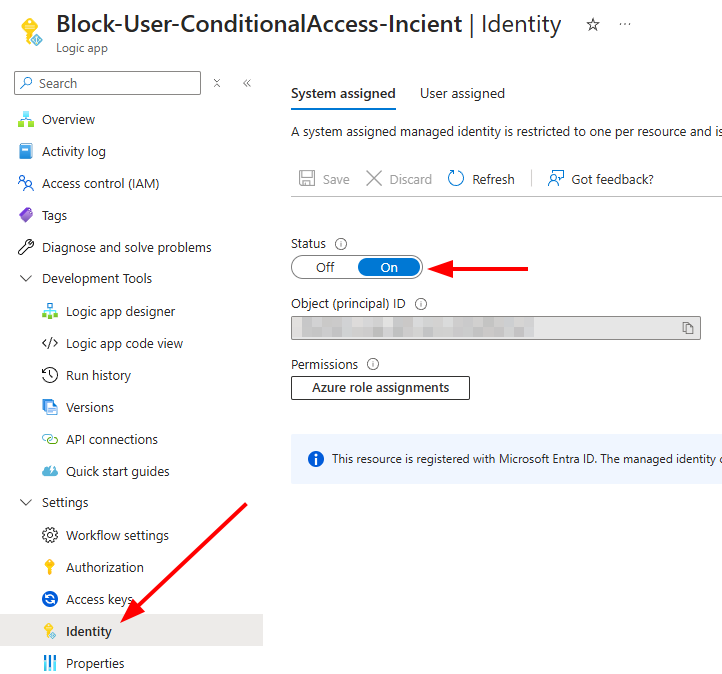
Start editing the logic app
- Open the Logic App in Edit mode.
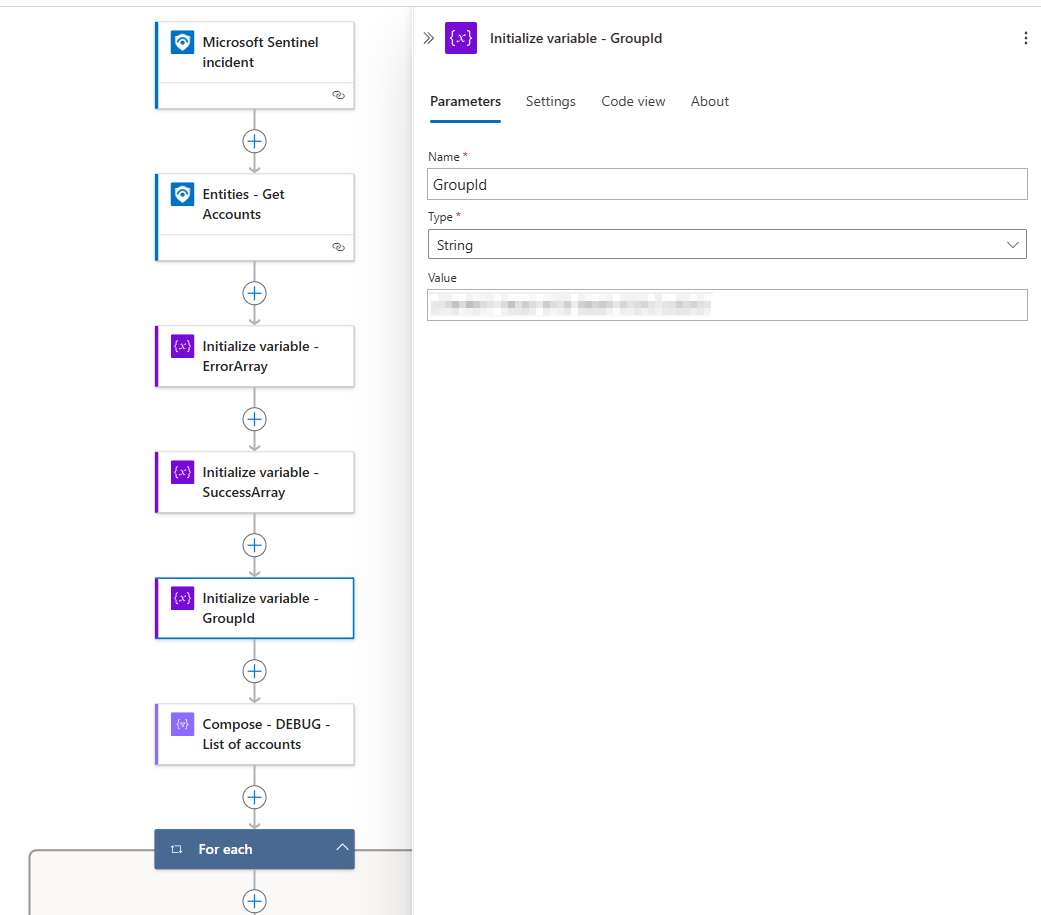
- Add a Microsoft Sentinel Incident trigger.
- Add the following actions:
- Entities - Get Accounts action.
- Initialize an empty ErrorArray (array).
- Initialize an empty SuccessArray (array).
- Initialize a GroupId variable (string) to store the Entra ID Group Object ID that you previously created.
You can optionally add a Compose action for debugging purposes. In my case, I use it to display the accounts from the Entities - Get Accounts action as input for debugging.
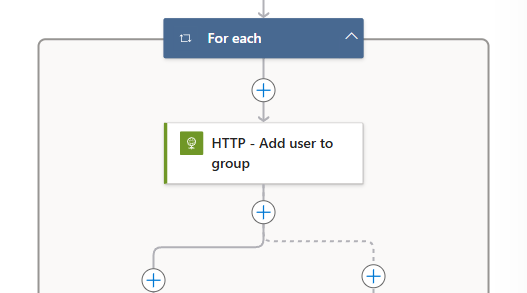
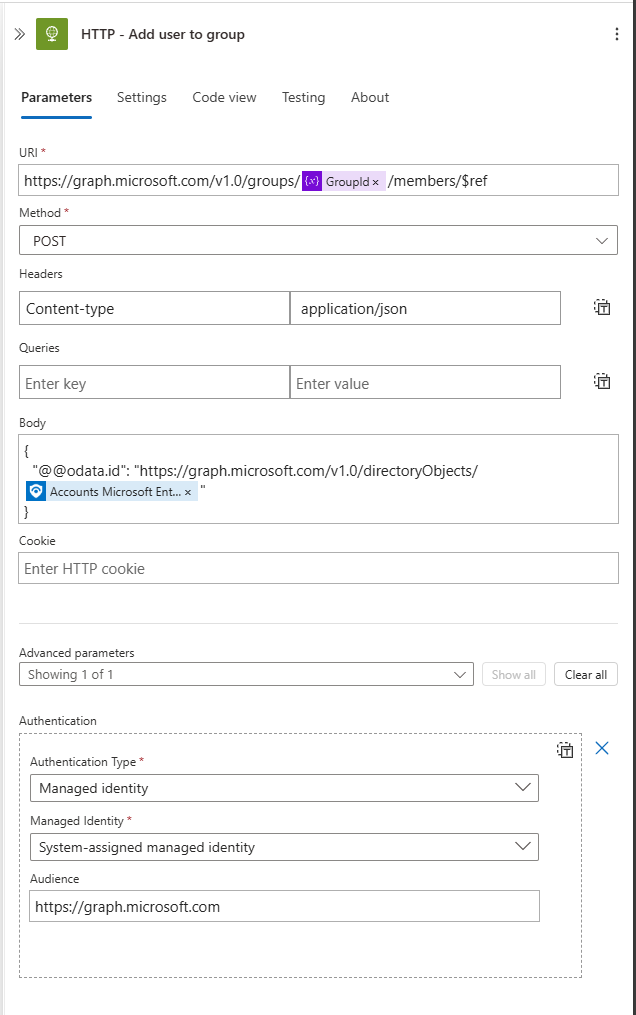
HTTP - Add user to group
Next, create an HTTP action with the following URI:
1
https://graph.microsoft.com/v1.0/groups/{group-id}/members/$ref
Replace {group-id} with the value of the GroupId variable.
Add the following JSON to the body:
1
2
3
{
	"@odata.id": "https://graph.microsoft.com/v1.0/directoryObjects/{id}"
}
Replace {id} with the Microsoft Entra ID User ID from the Entities - Get Accounts action. Once you add this dynamic property, the Logic App will automatically create a For Each loop because you are referencing the Accounts array.
Don’t forget to add Authentication from Advanced Parameters
- Authentication type: Managed Identity
- Managed Identity: System-Assigned managed identity
- Audience: https://graph.microsoft.com
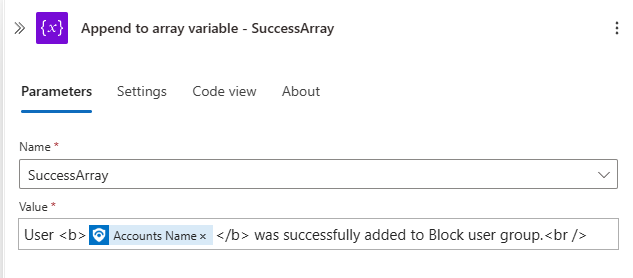
Append to array variable - SuccessArrau
Next, handle successful and failed HTTP requests.
- Start by adding an Append to array variable action.
- Select the SuccessArray variable.
- Add the following text as the value:
1
User <b></b> was successfully added to Block user group.<br />
- Inside the
<b></b>tags, insert the Accounts Name property from the Entities action.
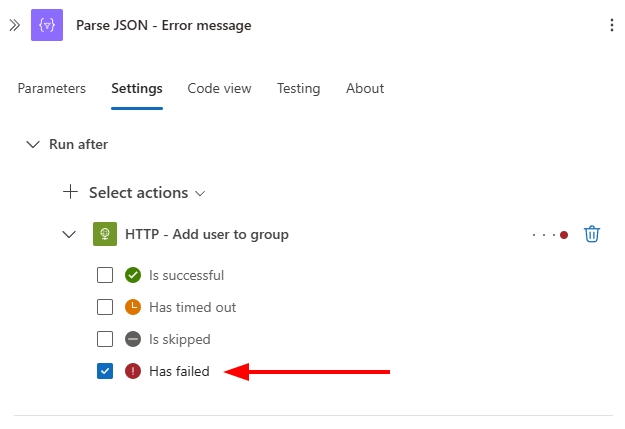
Parse JSON - Error message
Create a parallel branch between the HTTP action and the Append to array variable action.
- Add a Parse JSON action, with content from the HTTP action’s Body.
- Use the following schema:
1
2
3
4
5
6
7
8
9
10
11
12
13
14
15
16
17
18
19
20
21
22
23
24
25
26
27
28
29
30
{
  "type": "object",
  "properties": {
      "error": {
          "type": "object",
          "properties": {
              "code": {
                  "type": "string"
              },
              "message": {
                  "type": "string"
              },
              "innerError": {
                  "type": "object",
                  "properties": {
                      "date": {
                          "type": "string"
                      },
                      "request-id": {
                          "type": "string"
                      },
                      "client-request-id": {
                          "type": "string"
                      }
                  }
              }
          }
      }
  }
}
Let’s configure the Parse JSON action’s Run after settings.
- Open the Parse JSON action and go to the Settings tab.
- In Run after, ensure the HTTP action is selected as the preceding action.
- Expand the HTTP action and select only Has failed.
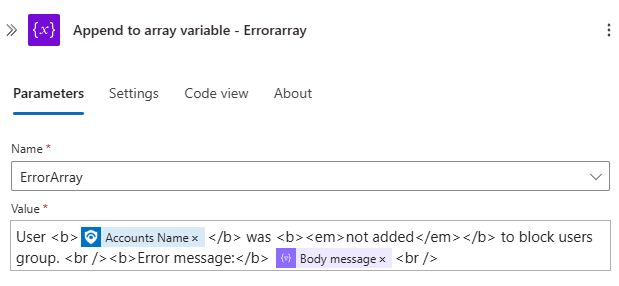
Append to array variable - ErrorArray
Next, create an Append to array variable action after the Parse JSON action. Use the ErrorArray variable and set its value to the following:
1
User <b></b> was <b><em>not added</em></b> to block users group. <br /><b>Error message:</b> <br />
- Inside the
<b></b>tags, insert the Accounts Name property from the Entities action. - After
message:</b>, add the Body message from the Parse JSON action.
Overview of the For each
Now your For Each loop should look similar to this: 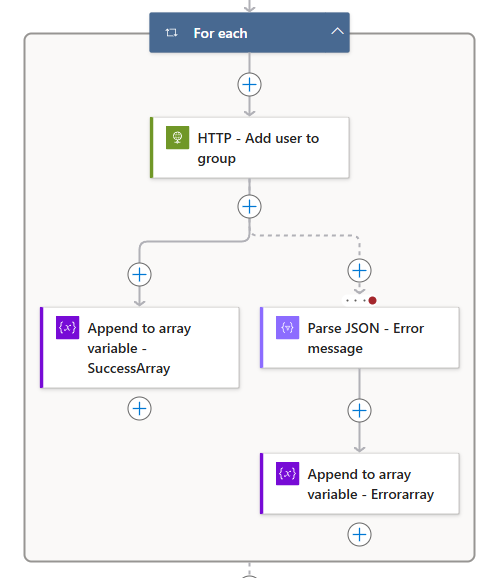
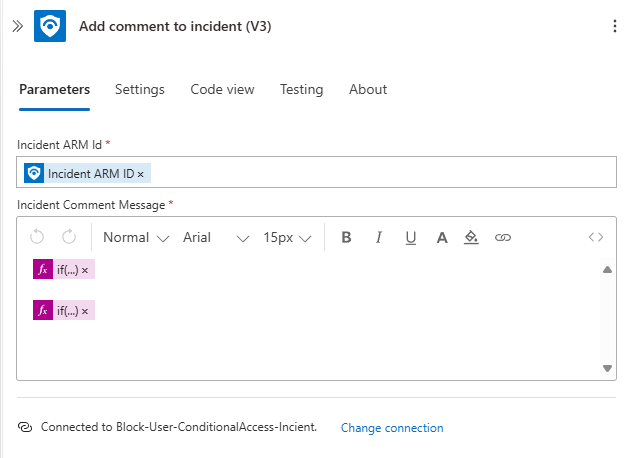
Add comment to incident
For the final action, add Add comment to incident (V3). Use the Incident ARM ID property for the Incident ARM ID field and the following functions for the comment messages:
1
2
if(empty(variables('SuccessArray')),'',join(variables('SuccessArray'),','))
if(empty(variables('ErrorArray')),'',join(variables('ErrorArray'),','))
Here’s a copy & paste explanation from last post for the functions
The
if()expression is used to check whether the arrays are empty by leveraging theempty()function:
- If the array is empty, display nothing (
'').- If the array contains data, use the
join()function to concatenate the array elements into a string, with each value separated by a comma.
So, the Add Comment to Incident action should look similar to this:
Next, open the Settings tab for the Add Comment to Incident action. In the Run after settings, select is successful and Has failed from the For Each loop. This ensures that the comment action executes even if the For Each loop has failed iterations. 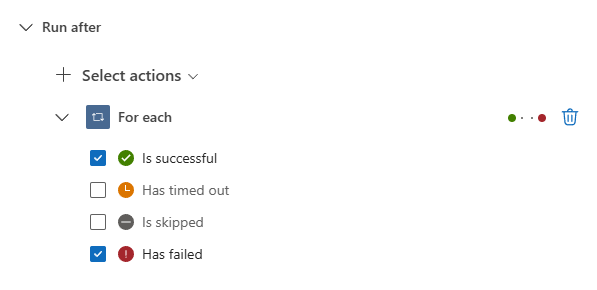
Overview of the logic app
Now your Logic App is complete! The entire Logic App should look similar to this: 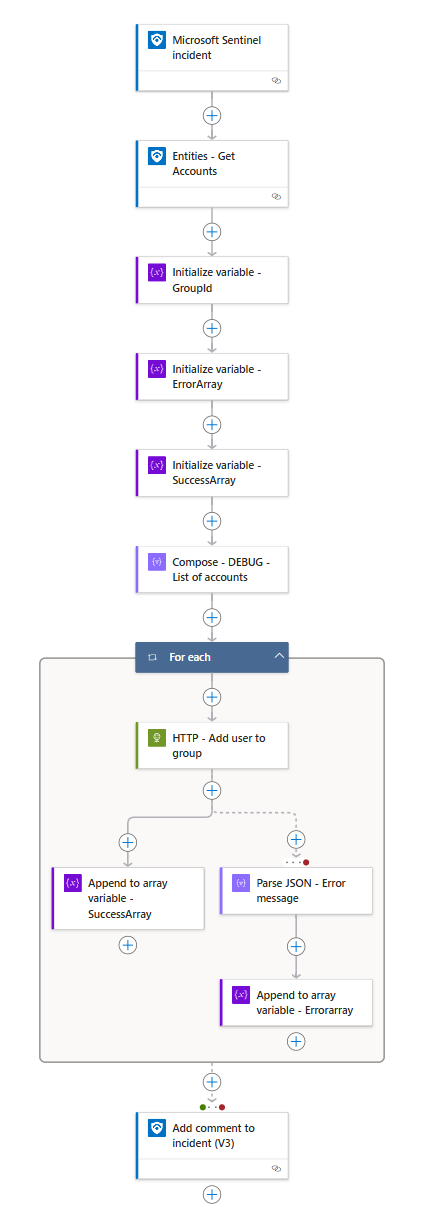
Assign permission to Managed identity
Here’s a PowerShell script for assigning permissions to a Logic App’s managed identity. This is required so logic app can add members to a entra id group. Remember to replace the ObjectID with the actual managed identity ID.
The following commands use the MgGraph PowerShell module to assign permissions to the managed identity. If you don’t have the module installed, you can follow these instructions to install the Microsoft Graph PowerShell SDK: https://learn.microsoft.com/en-us/powershell/microsoftgraph/installation?view=graph-powershell-1.0
1
2
3
4
5
6
7
8
9
10
11
12
13
14
15
16
17
18
19
20

# Add the correct 'Object (principal) ID' for the Managed Identity
$ObjectId = "MIObjectID"

# Add the correct Graph scope to grant
$graphScope = "GroupMember.ReadWrite.All"

Connect-MgGraph -Scope AppRoleAssignment.ReadWrite.All
$graph = Get-MgServicePrincipal -Filter "AppId eq '00000003-0000-0000-c000-000000000000'"

$graphAppRole = $graph.AppRoles | ? Value -eq $graphScope

$appRoleAssignment = @{
    "principalId" = $ObjectId
    "resourceId"  = $graph.Id
    "appRoleId"   = $graphAppRole.Id
}

New-MgServicePrincipalAppRoleAssignment -ServicePrincipalId $ObjectID -BodyParameter $appRoleAssignment | Format-List
Possible modifications
Entity trigger
If you wish to create an entity trigger for this process, you can reference the information in the incident trigger logic. To do this, create a new logic app with an entity account trigger and modify the HTTP request as needed.
Alert trigger
Creating an alert trigger should be fairly straightforward. Simply replace the current incident trigger with an alert trigger, and the logic should remain the same. Remember to modify the actions to get the correct information from alert trigger.
Parse UPN
Not all incidents provide the same user information. Be sure to test your use cases and check whether you need to modify how user information is parsed. In my example, I can retrieve the user’s object ID, so I didn’t need to make additional modifications for this demo.
However, in some environments and analytic rules, you may not receive user details like the object ID or UserPrincipalName. In such cases, you’ll need to find a workaround to retrieve the correct information—either by modifying the analytic rules or by adding extra logic to your playbook.
Extra, unblock user
Unblocking a user follows the same logic as blocking a user in the incident trigger. However, instead of adding the user to the group, we remove the user from the group. This can be done using the Remove member endpoint from Graph Api
Closing thoughts
This demo provides a simple way to block users’ access to Microsoft 365 when modifying the accountEnabled property in user settings isn’t feasible. I haven’t included thoughts on Conditional Access policy governance or framework references, as these can vary widely between organizations. Instead, I’ve focused on presenting a foundational idea to inspire you to develop a solution tailored to your organization’s needs.
As always, ensure you thoroughly test and customize this solution to meet your specific requirements. Most importantly, do not lock yourself out of your tenant!
You can find my Block User with Conditional Access Playbook Bicep Templates on GitHub: Block-EntraIdUser-ConditionalAccess.
I hope you found this guide insightful!
-Anssi

