Block Entra ID User playbook for Microsoft Sentinel
This is a simple playbook designed to block an Entra ID user by updating the user’s accountEnabled property via the Graph API.
A year ago, when I wanted to complete this exercise, I initially planned to modify the existing Microsoft Sentinel community block playbook. However, after some time, I decided to recreate it with my own touch.
My goal was to create a straightforward playbook that blocks users, adds a comment with the results to the incident, and avoids unnecessary features (to me) like email notifications. The aim is to provide a minimalistic template containing only the core features, which can easily be extended based on specific needs.
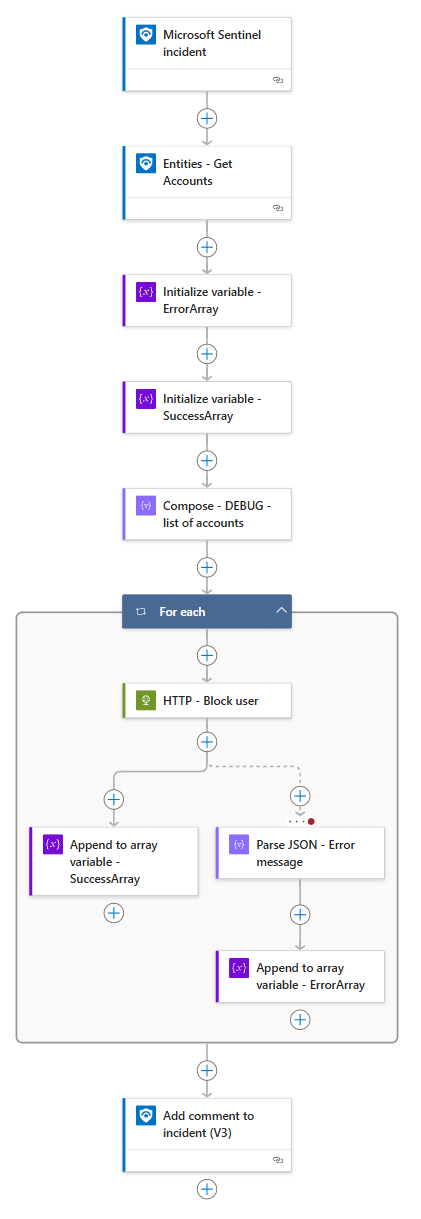
Playbook overview
- Incident-triggered Logic App
- Retrieve accounts from the incident
- Loop through the accounts
- Block the user
- Gather results
- Post the results to the incident as a comment
The Logic App uses a system-assigned managed identity for connections to both Sentinel and the Graph API.
Create a incident trigger logic app
- Create a Logic App.
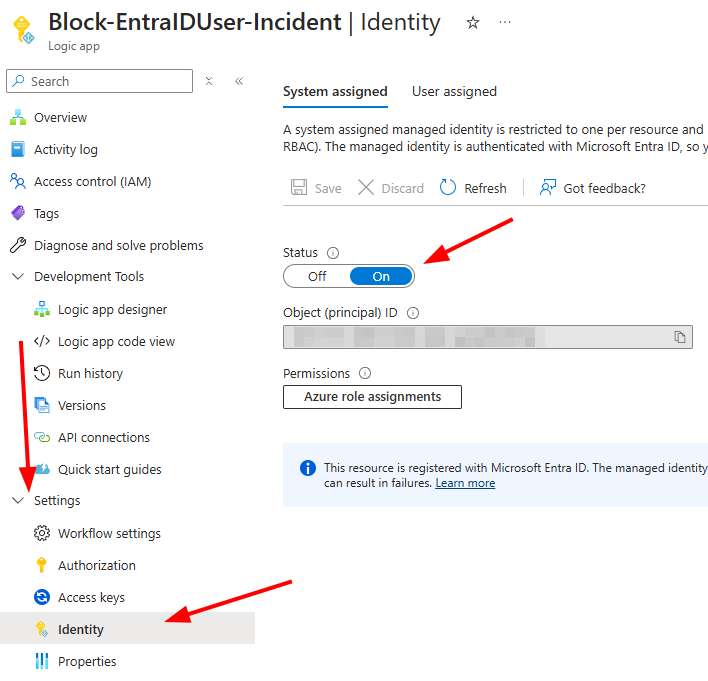
- Open the Logic App and navigate to Settings → Identity.
- Enable the system-assigned managed identity.
- Edit the Logic App.
- Add “Microsoft Sentinel Incident” as a trigger.
- Retrieve account entities from the incident trigger.
- Initialize empty arrays for
ErrorArrayandSuccessArray.
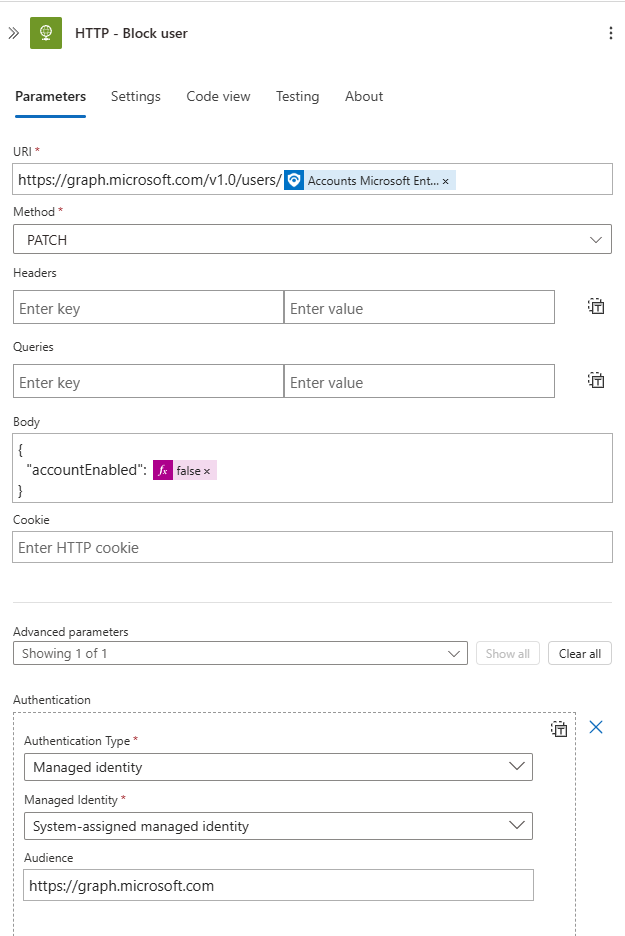
- Add HTTP Action with following properties
- URI:
https://graph.microsoft.com/v1.0/users/(Append “Accounts Microsoft Entra ID user ID” from dynamic content.) - Method:
PATCH - BODY:
1
2
3
  {
  "accountEnabled": false
  }
Note: Ensure you add
falseas an expression! - Advanced Parameters for Authentication: - Authentication type:
Managed Identity - Managed Identity:
System-assigned managed identity - Audience:
https://graph.microsoft.comHere’s an example of an HTTP request action:
- URI:
Don’t worry about the “For Each” loop. Since Accounts Microsoft Entra ID user ID is an array, the Logic App will automatically create a “For Each” loop to iterate through it.
At this point, your setup should look something like this: 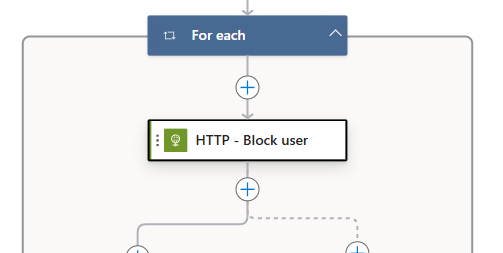
- Next, create an
Append to Arrayaction, and append the following text to theSuccessArray:1
User <b>ACCOUNT NAME HERE</b> was successfully disabled.<br />
Ensure you add the Account Name property from dynamic content between the
<b></b>tags (replacing theACCOUNT NAME HEREtext). - Add a parallel branch between the
HTTPaction and theAppend to Array variableaction. In this parallel branch, include aParse JSONaction with the following schema:1 2 3 4 5 6 7 8 9 10 11 12 13 14 15 16 17 18 19 20 21 22 23 24 25 26 27 28 29 30
{ "type": "object", "properties": { "error": { "type": "object", "properties": { "code": { "type": "string" }, "message": { "type": "string" }, "innerError": { "type": "object", "properties": { "date": { "type": "string" }, "request-id": { "type": "string" }, "client-request-id": { "type": "string" } } } } } } }
Use the HTTP action’s body as the content for the
Parse JSONaction. - Open the
Parse JSONaction and navigate to the Settings tab. - Configure the Run After setting: expand the HTTP action and select only Has failed. This allows you to handle HTTP failures.
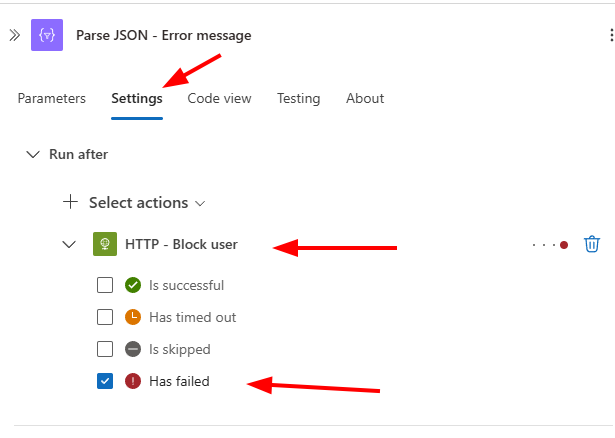
- Add an “Append to Array” action after the
Parse JSONaction. - Update the
ErrorArraywith the following value:1
User <b>ACCOUNT NAME HERE </b> was <b><em>not disabled</em></b>. <br /><b>Error message:BODY MESSAGE HERE</b> <br />
Ensure you replace
ACCOUNT NAME HEREwith the Account Name from dynamic content and update the error message by replacingBODY MESSAGE HEREwith the Body message from theParse JSONaction in dynamic content.The entire “For Each” loop (including the
Append to Array Variable - ErrorArray) should look like this:

- Finally, add the
Add comment to incident (V3)action outside of the “For Each” loop as the last action in the Logic App. - Provide the Incident ARM ID to the comment action.
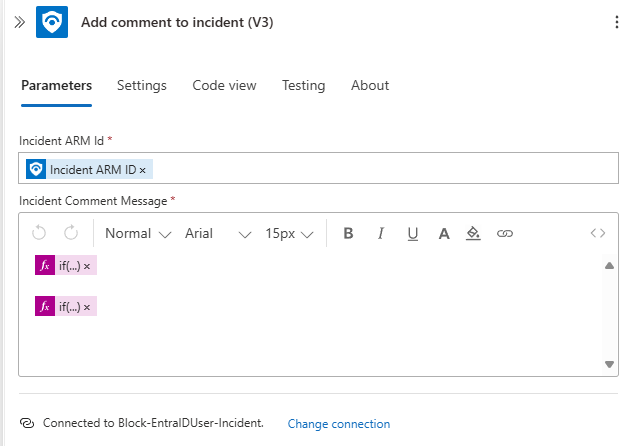
- Add the following expressions to the comment section:
1
2
3
if(empty(variables('SuccessArray')),'',join(variables('SuccessArray'),','))

if(empty(variables('ErrorArray')),'',join(variables('ErrorArray'),','))
Explanation of the expressions:
Theif()expression is used to check whether the arrays are empty by leveraging theempty()function:- If the array is empty, display nothing (
''). - If the array contains data, use the
join()function to concatenate the array elements into a string, with each value separated by a comma.
- If the array is empty, display nothing (
- Save the Logic App.
- Assign permissions to the managed identity (see the PowerShell commands below).
- Assign the Microsoft Sentinel Responder role to the managed identity, if applicable.
- Test the playbook from Sentinel.
Assign Permission to Managed identity
Here’s a PowerShell script that assigns the required permissions to the managed identity for the HTTP call.
The script utilizes the MgGraph PowerShell module.
1
2
3
4
5
6
7
8
9
10
11
12
13
14
15
16
17
18
19
20
21
22
23
24
25
26
27
28
29
30
31
32
33
34
35
36
# Add the correct 'Object (principal) ID' for the Managed Identity
$ObjectId = "4ef75f41-6964-48df-8a86-ada069b0f5b2"

# Add the correct Graph scopes to grant (multiple scopes)
$graphScopes = @(
    "User.ManageIdentities.All",
    "User.EnableDisableAccount.All"
)

# Connect to Microsoft Graph
Connect-MgGraph -Scope AppRoleAssignment.ReadWrite.All

# Get the Graph Service Principal
$graph = Get-MgServicePrincipal -Filter "AppId eq '00000003-0000-0000-c000-000000000000'"

# Loop through each scope and assign the role
foreach ($graphScope in $graphScopes) {
    # Find the corresponding AppRole for the current scope
    $graphAppRole = $graph.AppRoles | Where-Object { $_.Value -eq $graphScope }

    if ($graphAppRole) {
        # Prepare the AppRole Assignment
        $appRoleAssignment = @{
            "principalId" = $ObjectId
            "resourceId"  = $graph.Id
            "appRoleId"   = $graphAppRole.Id
        }

        # Assign the role
        New-MgServicePrincipalAppRoleAssignment -ServicePrincipalId $ObjectId -BodyParameter $appRoleAssignment | Format-List
        Write-Host "Assigned $graphScope to Managed Identity $ObjectId"
    } else {
        Write-Warning "AppRole for scope '$graphScope' not found."
    }
}
Future Improvements
If desired, you can easily create alert triggers and entity playbooks using this guide. To create an alert trigger, simply copy & change the Logic App trigger from incident to alert.
For an entity trigger, the Logic App only requires one trigger (entity) and one action (HTTP).
If you also wish, you can create an unblock playbook by copying the block Logic App and changing accountEnabled to true (remember to use true as an expression!).
Wrapping Up
This is a simple demo for blocking a user from signing in to their Entra ID Account. I developed this using a test analytic rule (which creates incidents for testing purporses), and this rule provides the user object ID that I can use in the HTTP call. You wouldn’t want this to fail in the case of a true positive incident, so make sure you test it with multiple use cases to determine how to retrieve the user object ID. In the worst case, you may need to adjust all analytic rules that provide account entities or define separate logic in the Logic App to correctly retrieve the user’s object ID.
Also, keep in mind the permissions. I used the least privileged permissions available, but depending on your use case, they may not be sufficient for certain roles. Refer to the update user documentation and the who can perform sensitive actions table for more information.
Here’s the link to my Block user Bicep templates on GitHub, and in the next post, I will explain an alternative way to block users.
I hope you found this helpful!
-Anssi

